I’ve been meaning to blog for ages, about various things. Rather than getting increasingly frustrated about the number of outstanding blogs building up, I thought a quick general update would be in order, to bring things up to date in the world of the badger’s kitchen garden and home brewing escapades.
The spuds love the weather more than I do…
So, it’s been nice weather for ducks. And for spuds, it would seem. After an initial panic that the weather was far too wet and cloudy for my seed potatoes to sprout, over the last couple of weeks; in line with drier and sunnier weather, my potato plants have surfaced, and are starting to thrive.

I’ve now earthed up the plants (twice for some of the larger ones) and am mulching them with grass cuttings, in 2 inch stages, 2 weeks apart.
A week or so ago, I was digging emergency drainage and literally bailing out my garlic plants (right hand side at the back of the photo) but now they, to, are happy and thriving, as are my onions (left hand side).
My reuse projects are shaping up nicely…
I must make some time to get some more projects on the go, reusing waste to my benefit in the garden. I particularly want to get some water harvesting sorted, using old food grade barrels.
My two main, new for this year, reuse projects are my lolly jar salad planters:
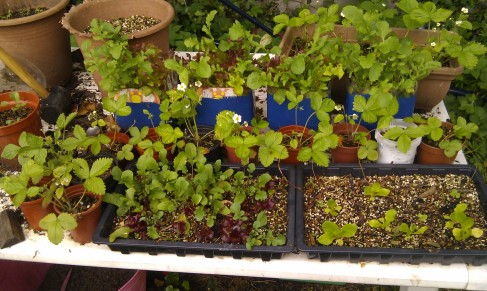
And my potatoes, growing in old car tyres:

I’m really pleased with the progress of both. I’ve already blogged about how to make the salad planters. For the potatoes, I just filled the tyre with compost, planted 4 small seed potatoes in it (probably 2 too many!) and mulched with grass clippings. I lined the tyre with plastic and left enough of a skirt to add another tyre on top and also line that, once the plants grow over the top of the first tyre.
The planters are thriving. I cut the tops off the bottles once the leaf grew enough and have been regularly harvesting it since. Tilly has fresh rocket in her packed lunch nearly every day and we have had a couple of salad meals, using the rocket & baby leaf mix, along with garlic mustard, lemon balm, fennel, bitter cress & chives, all fresh from the garden.
The potatoes in tyres are now growing well. Slower than those in the ground, interestingly, and one has been completely eaten by something (not a problem, as I had planted too many anyway).
If it grows, ferment it!
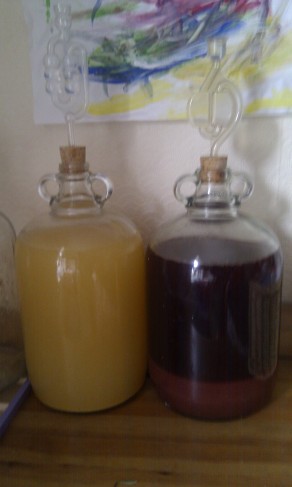
I’ve been meaning to make some nettle beer ever since last Autumn, when I was introduced to it by my brother in law. Having borrowed some brewing equipment from a friend, I finally got round to making some dandelion wine a couple of months ago and that sparked off a new interest (nay, obsession!) with home brewing.
Since this time, I’ve made 1 gallon batches of ginger beer, fiery ginger beer (with chilli), nettle & ginger beer, lemon hooch & sloe wine, with plans to make a 5 gallon batch of nettle & ginger (in a pressure barrel), 1 gallon gorse wine, 1 gallon tea wine, 5 gallons elderflower champagne & some elderflower cordial and non-alcoholic ginger beer (both with the kids in mind).
I’m sure I will be blogging again, in more detail, about home brewing, but here are a couple of recipes for quick and easy, cheap brews, which are completely delicious. They both take about 10 days from start to finish but with a total input time of less than 2 hours. The result, in both of these cases, is delicious home brew. Probably about 6 – 7% (must get a hydrometer, so I can actually measure strength). The cost, per pint, works out at around 40p a pint (this cost will reduce as and when I scale up to 5 gallon batches).
Tom’s Nettle & Ginger Beer
Ingredients:
1 carrier bag nettle tops
1 handful cleavers (/goosegrass/sticky willy – same plant)
150g grated fresh ginger
Juice of 2 lemons
15g Cream of Tartar
600g sugar
2 tablespoons honey
1 g (1 level tsp) ale yeast (ideally, bread yeast will do the same job)
1 gallon water
Method:
Boil nettle tops/cleavers/ginger/lemon juice in a large pan (as near to 1 gallon as poss) full of water. Cool until okay to handle & strain off the bits, either through a muslin bag, or a large, fine mesh sieve. Add juice back to pan & add sugar/honey/cream of tartar. Heat & stir until all sugar dissolved. Remove from heat, cover with a cloth & leave until room temperature. Add yeast (started separately if required, or just floated on the top otherwise) & stir. Leave in pan for 2 – 3 days for the yeast to get going. Ideally funnel into a sterilised demijohn and fit an airlock but if you don’t have one, add to sterlised 2ltr (coke, etc.) bottles, leaving a few inches of space for the CO2 to expand into.
If using a demijohn, ferment with cloth covering top for 48hrs, add airlock & ferment for a further 3 days.
Chill demijohn for 2 days in a fridge, to deactivate and settle yeast.
Siphon beer, leaving the slurry.
Bottle, priming with 1 tsp sugar (per 500ml). Leave at room temperature for 48hrs to carbonate.
Chill to serve.
If using coke bottles, let the pressure off every day for 5 days. Leave for 48hrs without letting it off, chill for at least 3 days.
____________________
Tom’s Fiery Ginger Beer
Ingredients:
150g fresh ginger (grated)
Juice of 3 lemons
4 tbsp runny honey
1/4 tsp hot, red, dried chilli
1/4 tsp Cream of Tartar
600g sugar
Yeast & nutrient
Method:
Mix ginger, lemon juice, honey, chilli & Cream of Tartar, in a bowl. Add mixture and sugar, through a funnel, to a demijohn.
Top up to 1 gallon with water & add 1 tsp nutrient. Shake demijohn well, until all sugar is dissolved.
Leave until liquid reaches room temperature & add 1 tsp ale yeast.
Cover with a cloth and leave for 48hrs.
Fit an airlock and leave for a further 3 days.
Chill demijohn for 2 days in a fridge, to deactivate and settle yeast.
Siphon beer, leaving the slurry.
Bottle, priming with 1 tsp sugar (per 500ml). Leave at room temperature for 48hrs to carbonate.
Chill to serve.
WARNING: BOTH OF THESE RECIPES ARE QUITE VOLATILE. USE PLASTIC BOTTLE FOR MAXIMUM SAFETY. BOTH DRINKS ARE DELICIOUS WITH NO BUBBLES, SO THE PRIMING STAGE CAN BE SKIPPED IF WANTED.
Some key dates and more recipes can be found in my calendar, in the about section.


